Custom Theme
You can save all your formatting and functionality changes in a custom theme. This is where you can upload and download themes specifically designed for the date picker.
You can only use themes generated in the date picker to upload.
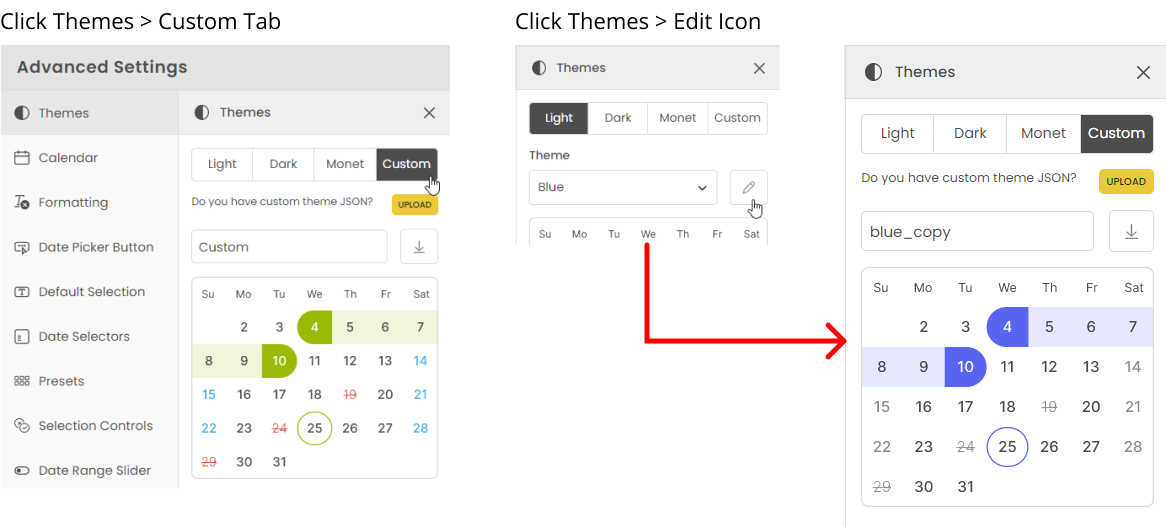
Switching to the Custom Tab:
- Open theme > select Custom tab.
Here, you will see a custom color scheme with green, red, and blue colors.
- Open theme> Click on the Edit (✎) icon from the built-in theme.
In this view, the custom tab will show the same colors used in that theme.
Using a Custom Theme:
There are two ways to use a custom theme:
Global level setting:
In global styling, You can modify the fundamental colors and font families simultaneously. This mode remains unaffected by any functionality changes, such as disabling presets or selecting a single-month calendar. The moment you change the colors and font family in any other options, it will trigger the full customization view.
Using global styling helps keep a consistent style guide while allowing for specific changes to colors and fonts. For instance, if the user wants to change the font from "Segoe UI" to "Georgia". It is possible to do it all at once using global styling.

Full customization
The full custoization view refers to a theme that is fully customized, with different colors, font families, and functions for all components. This view is ideal if you want to create your own unique style from scratch.

Reset to Default:
After changing the formatting in other options, when the user re-opens the custom theme option, there is a prompt saying,
“New custom theme created based on selections made to fonts, colors, and functions.”
If you have accidentally changed the color and font family and want to switch back to a consistent style, select the “RESET TO DEFAULT” button. This will revert the theme to the last applied theme.
How to download/export a theme?
Once you're happy with the template you've created, you can save it and use it in other reports or share with someone else. To download a theme, go to custom tab and follow these steps:
Steps to generate a template
- Rename the template name
- Click on the download icon.

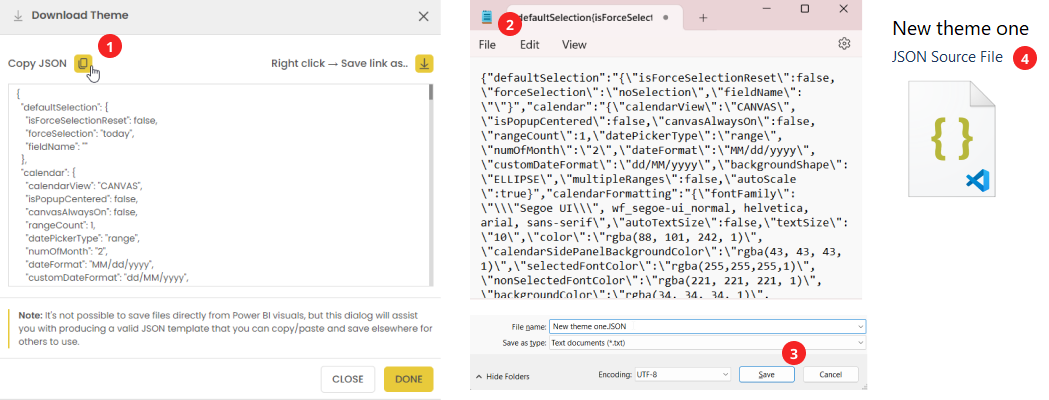
COPY TO CLIPBOARD
You will see a JSON code for your theme. If you want to make any changes, you cannot directly edit the code in the text box. Instead, modify the settings and generate the code again.
When you're ready, click on the "Copy JSON" button. This will copy the entire code to your clipboard.
Paste this code into an text editor or create a new text file. Save the file name with an extension of ".JSON". The file will look like below image:
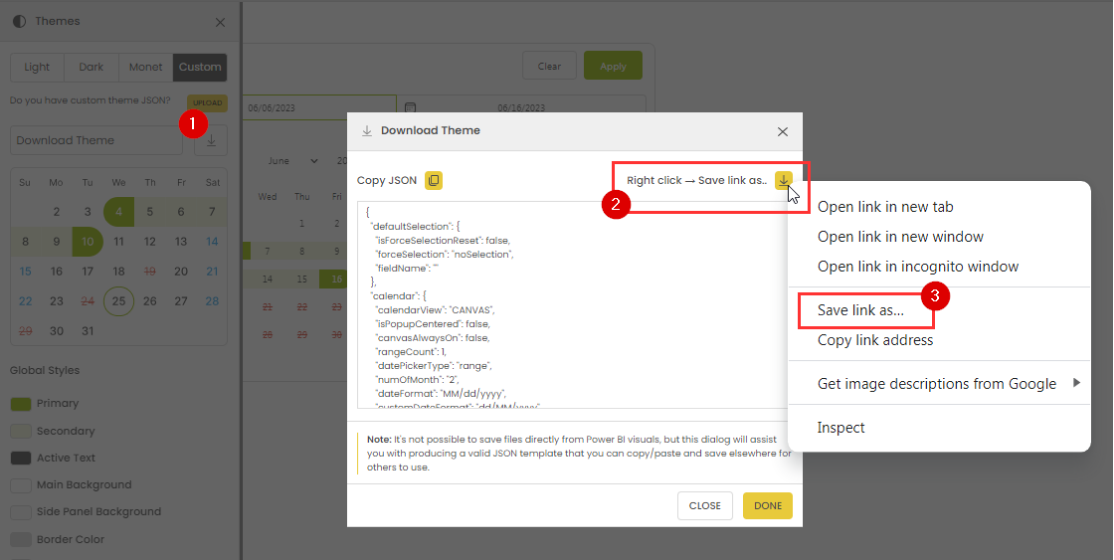
DOWNLOAD THE FILE
Please note that this option is only available in Power BI services. In the pop-up window, right-click on the download icon. Select the “Save link as” option. Choose the location and save the file. The file will be saved in JSON format only.

Custom themes that you can use right now
Use below JSON files in your Power BI report.
| Theme | Link | Image |
|---|---|---|
| Theme 1 | Right click > Save link as... |  |
| Theme 2 | Right click > Save link as... |  |
| Theme 3 | Right click > Save link as... |  |
How to upload a theme
This option gives you the flexibility to collaborate and use the themes created by others. These JSON files contain all the formatting and functional changes. To upload a theme, follow these steps:
To upload a file:Go to advanced settings > themes > custom tab.
- Click on the "Upload" icon.
- Select the JSON file to upload.
You will receive a prompt confirming that the file has been successfully imported.
- Hit Apply.
